

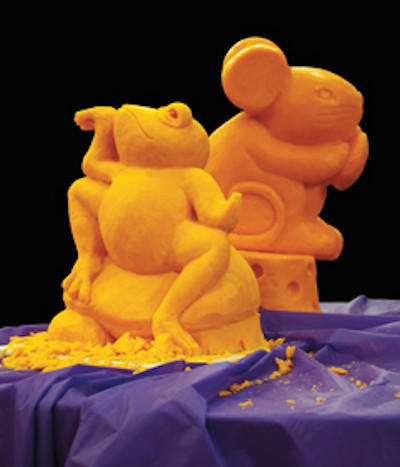
It’s not quite the same as Michelangelo chiseling a block of marble to release his David, but Sarah Nep, Jim Victor, and Troy Landwehr patiently chip away at blocks of cheddar, Parmesan, Monterey Jack, and other cheeses, working to find their masterpiece within.
Although food carving has a long history, dating to the 13th century, cheese is one of the newer mediums—yet its popularity is growing rapidly as it proves to be a more substantial, forgiving, and enduring substance than other popular contenders like butter and ice. “Butter sculptures can be bigger because butter is denser,” Victor says. But butter also must be carved in temperature-controlled rooms. “The beauty of cheese,” says Nep, who has carved likenesses of Bill Clinton and Bob Dole for the California Milk Advisory Board, “is that it can be carved anywhere.”
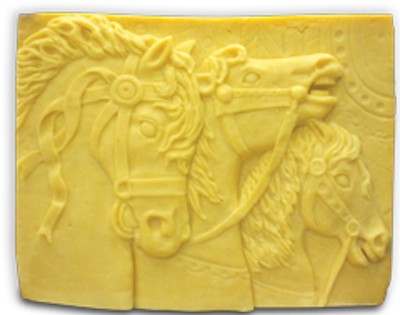
And just about any cheese can be carved. Although carvers rarely get to choose their form (sponsors typically provide blocks of product), most learn to adapt quickly to the cheese at hand. “Cheddar has fewer challenges because it has the right oil and whey consistency for carving,” says Landwehr, who has shaped the character Remy from the film Ratatouille for Disney and a replica of the Lincoln Memorial for Cheez-It. Besides, he adds, cheese carving strokes show up better in yellow and orange than in white.
Victor, who also creates butter and chocolate sculptures, likes to carve Parmesan cheese because it lasts longer than cheddar. “Parmesan doesn’t get moldy as quickly,” he notes. Nep, however, has had a few problems with that cheese. “I had one sponsor who gave me aged Parmesan to carve,” she says. “It took me an hour just to carve through the rind.” And Landwehr found that carving a football sculpture into provolone was a hassle. “It peeled like an onion,” he recalls.
When it comes to soft cheeses, like Brie or blue, Landwehr slices off slabs to insert into the main sculpture for color and texture. Victor, however, turns soft cheeses into clay, smooshing them into balls to sculpt into the shapes he needs.
Nep is the only one of the three to have received any formal training in cheese sculpting. “The Wisconsin Milk Marketing Board was at one time trying to develop cheese carvers across the country,” she says. “They provided those of us who were interested with a short lesson. That’s the only formal training I’ve had.” Nep, however, has been trained in fine arts, as has Victor; Landwehr has a degree in design. All three use clay sculpting tools to create their works and stainless-steel wire for cutting, but they admit to occasionally diving into kitchen cupboards to retrieve tools like cheese graters, planes, and knives. “I once used a melon baller to create dimples on a football,” Nep says.
Troy Landwehr’s football-themed blueprint and his finished carving
Nep and Victor improvise their designs, but Landwehr starts with line drawings to ensure that he and his clients are on the same page, and he admits to spending extra time drawing faces. “Normally, I draw faces over and over for a week or two before I carve,” Landwehr says, “so I am familiar with all aspects of the face.”
As difficult as some professional cheese sculpting is, however, there is, of course, a side benefit. “Yes, I eat pieces I’ve carved off,” Nep admits. Victor says he used to collect his cheese cast-offs and serve them to the crowd. (Now he asks volunteers to do it.)
As for what becomes of the giant cheese sculpture? “The carving is normally auctioned off the last day of the convention or event,” Landwehr says. “Then it’s eaten.”
You Can Carve
You don’t have to be a professional to create a cheese masterpiece for your next party. Anyone can try cheese carving—with these expert tips.
Visit an art supply store and pick up a few sculpting tools. Troy Landwehr uses a ribbon tool, perforated rasp, and band saw; Jim Victor employs a set of clay sculpting tools, “flat, not rounded ones”; and Sarah Nep suggests that ceramic carving tools also work well, as do kitchen tools. Cheese graters and paring knives can help round edges, and melon ballers make good circles. Adds Nep: “Use X-Acto knives for cutting letters and design shapes.”
Choose cheddar, at least for your first project. “It has the right consistency and density,” Landwehr says. It also is inexpensive: two- to five-pound blocks are easy to find at local grocery stores. Make sure the cheddar is young, between a couple of weeks to six months old; any older and the cheese may crumble upon carving.
Find a cool location, says Victor, who recommends carving in an unheated garage, but both Landwehr and Nep say that cheese carving can take place anywhere. “If the cheese becomes too soft, just put it back in the refrigerator for an hour and take a break,” Landwehr says. Then pull it out and go back to work.
Begin with a simple shape. A heart, a football, or even a small teddy bear are simple projects for beginners. Landwehr suggests sketching the shape on a sheet of paper, then cutting it out and placing it (or tracing it) on the block of cheese to identify which areas need to be cut away.
Avert typical problems. When working in 3-D, Landwehr suggests working entirely around the cheese instead of focusing on just one area. Otherwise, the work may become too heavily weighted to one side and collapse. “Work slowly,” Nep adds. “You can’t put the cheese back once you take it off.” Small pieces may be added with a toothpick, she says, “but it’s better to carve it all out of one block because the added cheese tends to separate [over time].”
Preserve the sculpture. Once your carving is completed, clean off any stray shavings with a dry two-inch paintbrush. Spray the cheese with oil or cooking spray and cover it with plastic wrap, making sure to remove all air bubbles. A plastic bag may also be used; in that case, leave some air in the bag. Otherwise, water from the cheese will condense onto the plastic and discolor the cheddar.
Display your masterpiece. Place the completed sculpture on a platter or cake stand and surround it with chunks of your favorite cheese for nibbling. Nep suggests decorating with kale leaves or even nontoxic flowers; Victor uses fruit; and Landwehr shreds small chunks of cheese to create a base for the carving. Then, stand back, says Nep, and “let your guests to be wowed!”